The ability to join two pieces of natural material together, and so increase their length, gives man the ability to make full use of many natural materials found locally.
Sailors probably did more to develop order in the tying of knots, because for them it was necessary not only to tie securely but also to be able to untie, often in the dark and under conditions of bad weather and with rain-tightened ropes.
In bushcraft work probably half a dozen knots would suffice, but knots and knotting have a fascination for many people the world over, and a comprehensive range of knots, plain and fancy, and, with these, splices, whipping, plaits, and net making are included in this book with information of general use.
Knot tying is a useful exercise to obtain better coordination between eyes and fingers. The identification of knots by feel is an excellent means of developing recognition through touch.
In all woodcraft work it is necessary to know how to tie knots which will hold securely and yet can be untied easily. Many of the materials which you will have to use will be green, some will be slippery with sap, and there are many little nicks and knacks to get the best possible use from the materials available.
Knots and lashings take the place of nails for much bushwork, and when it comes to traps and snares, a thorough knowledge of all running knots is essential.
A brief description of the use to which the knot may be put is given in this book. The diagrams will explain how the knot is tied. The letter "F" means the free or untied end of the rope, and the letter "S" means the standing or secured end.
Knots For Rope Ends Or For Grips On Thin Rope
 Thumb Knot: To make a stop on a rope end, to prevent the end from fraying or to stop the rope slipping through a sheave, etc.
 Overhand Knot: Overhand knot may be put to the same use as the thumb knot. It makes a better grip knot, and is easy to undo.
![]() Figure Eight: This knot is used as the thumb knot. Is easy to undo, and more ornamental.
Figure Eight: This knot is used as the thumb knot. Is easy to undo, and more ornamental.
Knots For Joining Ropes
 Sheet Bend: To join or bend two ropes of unequal thickness together. The thicker rope is the bend.
 Double Sheet Bend: Similar to single sheet bend, but gives greater security, also useful for joining wet ropes.
 Crossover Sheet Bend: This holds more securely than either the single or double sheet bend and has occasional real uses such as fastening the eye of a flag to its halyard where the flapping might undo the double sheet bend.
 Reef Knot: To securely join two ropes of equal thickness together. Notice the difference in position of the free and standing ends between this and the thief knot.
![]() Thief Knot: To tie two ropes of equal thickness together so that they will appear to be tied with a reef knot, and will be retied with a true reef knot. This knot was often used by sailors to tie their sea chests, hence the name.
Thief Knot: To tie two ropes of equal thickness together so that they will appear to be tied with a reef knot, and will be retied with a true reef knot. This knot was often used by sailors to tie their sea chests, hence the name.
 Carrick Bend: This bend is for the secure fastening of two ropes of even thickness together. It is particularly suitable for hawsers and steel cables. It can be readily undone and does not jam, as do many other bends and knots.
 Stopper Hitch: To fasten a rope to another rope (or to a spar) on which there is already a strain. When the hitch is pulled tight the attached rope will not slip, and the tension on the main rope can be taken on the attached rope. Also useful for a climbing hitch.
 Flemish Knot or Double Overhand Knot: For securing two ropes or cords of equal thickness together.
![]() Fisherman's Knot: For joining two springy materials together; suitable for wire, fishing gut or vines. Two thumb knots (one on each rope) pulled tight. The knots lock together.
Fisherman's Knot: For joining two springy materials together; suitable for wire, fishing gut or vines. Two thumb knots (one on each rope) pulled tight. The knots lock together.
![]() Overhand Fisherman's Knot: Similar to fisherman's knot; for general uses. More positive for gut fishing lines and nylon.
Overhand Fisherman's Knot: Similar to fisherman's knot; for general uses. More positive for gut fishing lines and nylon.
Knots To Make Loops In Rope
 Bowline: To form a loop that will not slip on a rope end.
 Bowline On A Bight: To make a double loop that will not slip on a rope end. Also called a bo'sun's chair.
![]() Fisherman's Eye Knot: This is the best method of making a loop or eye in a fishing line. The strain is divided equally between the two knots.
Fisherman's Eye Knot: This is the best method of making a loop or eye in a fishing line. The strain is divided equally between the two knots.
 Slip Knot: For fastening a line to a pier or a pole or any other purpose where strain alone on the standing end is sufficient to hold the knot..
 Overhand Eye Knot: This method of making an eye or loop is satisfactory and quick, but it sometimes jams and becomes difficult to untie.
![]() Flemish Eye Knot: Used for all purposes where a loop is required, less likely to jam than overhand eye knot.
Flemish Eye Knot: Used for all purposes where a loop is required, less likely to jam than overhand eye knot.
 Crabbins Hitch: This eye knot, though not very well known, is one of the stoutest eye knots. It has not the tendency to cut itself or pull out common to some of the other eye knots. It also makes a useful running knot.
 Manharness Knot: This is a most useful knot for making a series of non-slip loops in a rope for the purpose of harnessing men for a pull. The marlinspike hitch is made as in lower sketch and then the loop is drawn under and over the other two ropes as indicated. The whole knot is then pulled taut.
 Midshipman's Hitch: This is an old-fashioned hitch often used to fasten a block or sheave to a rope's end.
![]() Jury Knot or True Lover's Knot: This knot is primarily for a mast head, to form loops by means of which the mast be stayed. It is called a jury knot because in sailing ship days it was often used to rig a temporary or jury mast. Three hitches as in top sketch are formed. The loop C is pulled under B and over A. D is pulled over E and under F. G is pulled straight up for the third loop. H is made by splicing the two free ends together.
Jury Knot or True Lover's Knot: This knot is primarily for a mast head, to form loops by means of which the mast be stayed. It is called a jury knot because in sailing ship days it was often used to rig a temporary or jury mast. Three hitches as in top sketch are formed. The loop C is pulled under B and over A. D is pulled over E and under F. G is pulled straight up for the third loop. H is made by splicing the two free ends together.
 Bow Thong Hitch: Used by New Guinea natives for securing the end of the split cane bow thong to the pointed end of the bow. Also useful for fastening rope over the tapered end of a spar.
Knots For Fastening Ropes
 Slippery Hitch: Very useful because of the ease with which it can be released in emergency. It holds securely for so long as there is a strain on the standing end.
 Clove Hitch: For securing a rope to a spar. This hitch, if pulled taut, will not slip up or down on a smooth surface. A useful start for lashings.
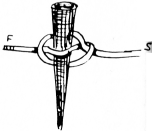 Boat Knot: This is a method of securing a rope to a thole pin or other small piece of wood on a boat. It is quickly released.
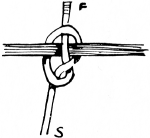
 Double Boat Knot: A bight is simply passed through the ring and a marlin spike or other round piece of wood is put between the bight or the rope. Withdrawal of the spike quickly releases the knot.
 Slippery Hitch: Very useful because of the ease with which it can be released in emergency. It holds securely for so long as there is a strain on the standing end.
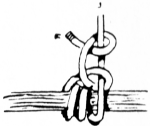 Rolling Hitch: To fasten a rope to a spar. This is a very secure fastening.
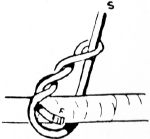 Timber Hitch: For securing a rope to squared timber, round logs, etc. A good starting knot for all lashings. The standing end must pull straight through the loop, not backwards, or the rope may cut upon itself.
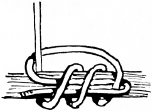 Halliard Hitch: For fastening a rope to a spar. The sketch shows the hitch open. When pulled taut, and the hitches closed, it makes a very neat and secure fastening.
 Blackwall Hitch: A quick way to secure a rope to a hook. The strain on the standing end will hold the rope secure to the hook.
 Noose Hitch: This is a quick and easy method of securing a rope to a spar or beam. If desired, the rope can be made more secure by means of the overhand knot shown in Fig. 2.
 Cat's Paw Hitch: For securing a rope to a hook or a spar. It is most useful because it is so easily tied.
![]() Lark's Head: This is an easy method of securing a rope to a ring or hook. If desired to make more secure, it can be stoppered, as shown, with an overhand or thumb knot.
Lark's Head: This is an easy method of securing a rope to a ring or hook. If desired to make more secure, it can be stoppered, as shown, with an overhand or thumb knot.
![]() Crossover Lark's Head: Used for purposes above.
Crossover Lark's Head: Used for purposes above.
![]() Double Lark's Head: The bight is first made. The ends passed through it. This knot is very secure.
Double Lark's Head: The bight is first made. The ends passed through it. This knot is very secure.
 Triple Lark's Head: The apparently complicated knot is easily made by taking the bight of the rope through the ring, the ends are passed through the bight and up through the ring, then down through its own bight. Like the double lark's head, this knot is absolutely secure.
![]() Sailor's Backhand Knot: Used to secure a rope to a ring or hook. This is very similar to the rolling hitch and sailor's backhand knot (alternative variation)
Sailor's Backhand Knot: Used to secure a rope to a ring or hook. This is very similar to the rolling hitch and sailor's backhand knot (alternative variation)
![]() Sailor's Knot: Simply two half hitches round the standing end of the rope.
Sailor's Knot: Simply two half hitches round the standing end of the rope.
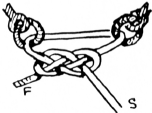 Gunner's Knot: This is simply a carrick bend and used to hold two shackles or rings together.
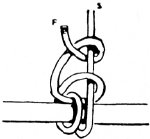 Sailor's Backhand Knot: (Alternative variation.) Used to fasten a rope securely to a spar.
 Catspaw: This knot is used for attaching a rope to a hook. The two bights are rolled two or three times and then put over the hook.
 Kellick Hitch: Used for fastening a stone (for a kellick in lieu of an anchor), that will hold in rocky sea bottoms where an anchor might foul. It is a timber hitch finished off with a half hitch.
 Tom Fool's Knot: Formed by making a clove hitch as two loops not exactly overlaying each other. The inner half of each hitch or loop is pulled under and through the outer side of the opposite loop, as indicated by arrows.
This knot can be used to improvise a handle for a pitcher by pulling the centre knot tight around the lip of the pitcher and using the loops as handles.
![]()
![]() Sheepshank: This is a convenient knot to quickly shorten a rope. One method of securing the end.
Sheepshank: This is a convenient knot to quickly shorten a rope. One method of securing the end.
![]() Sheepshank Toggled: The insertion of a toggle in the end bights secures the sheepshank against slipping.
Sheepshank Toggled: The insertion of a toggle in the end bights secures the sheepshank against slipping.
 Drum Sling: A slip knot is made as indicated, The drum, can or barrel is placed in the slip knot and the free end is secured with a stopper hitch to the standing end.
 Chain Knot: When a rope is too long for its purpose one means of shortening it is the chain knot. Remember to put a marlinspike or toggle through the last link before you put a strain on the rope.
![]() Double Chain Knot: This is the most ornamental of all the rope shortenings. A turn is taken round the standing end and the free end is passed through the loop so formed. In doing this a loop is formed through which the free end is brought. The end is thus passed from one side to the other through the loop preceding. It may be pulled taut when sufficiently shortened and will lock upon the last loop.
Double Chain Knot: This is the most ornamental of all the rope shortenings. A turn is taken round the standing end and the free end is passed through the loop so formed. In doing this a loop is formed through which the free end is brought. The end is thus passed from one side to the other through the loop preceding. It may be pulled taut when sufficiently shortened and will lock upon the last loop.
![]() Twist Knot: This is another easy method of shortening a rope. The rope is laid as in Fig. 1 and then the strands are plaited or braided together. A marlinspike or toggle is placed between the ropes in the centre to secure the hold of the plait.
Twist Knot: This is another easy method of shortening a rope. The rope is laid as in Fig. 1 and then the strands are plaited or braided together. A marlinspike or toggle is placed between the ropes in the centre to secure the hold of the plait.
Fancy Knots
 Wall Knot: Unlay the rope a few inches and then pass each strand through the bight of the strand in front. Illustration shows the wall knot ready to be pulled taut.
![]() Stopper Knot: Bring the ends of the wall knot round again and up in the centre of the knot and pull each one taut separately.
Stopper Knot: Bring the ends of the wall knot round again and up in the centre of the knot and pull each one taut separately.

 Crowning Knot: Commence the crowning as shown here.
The crowning is now ready to be pulled taut. The strands can be back spliced to permanently secure the end of the rope against ravelling or fraying. Crowning may also be used with other fancy knots such as crowning first, then pulling on a wall knot or a Mathew Walker
![]() Manrope Knot: This is a fancy knot to put a stop on the end of a rope. Top sketch shows the crowning (in the centre), and lower sketch shows the manrope knot pulled taut.
Manrope Knot: This is a fancy knot to put a stop on the end of a rope. Top sketch shows the crowning (in the centre), and lower sketch shows the manrope knot pulled taut.
 Double-Double Crowning Knot: This knot is started the same as the manrope, but not pulled taut. The ends are laid for a second crown above the crown (similar to the manrope knot) and with the spike the bends of the lower crown are opened, and the strands brought through these bends and pulled taut.
 Mathew Walker 1.: The strands are laid as in the diagram and then each in turn is pulled taut till the knot is close and tight. The knot itself is rolled up slightly to lay the twist evenly. Pull the strands tight again after this.
![]() Mathew Walker 2.: - finished and rolled tight. The Mathew Walker is reputed to be one of the most difficult of all knots to undo. The Mathew Walker can also be made some distance from the end of the rope and the strands then relaid.
Mathew Walker 2.: - finished and rolled tight. The Mathew Walker is reputed to be one of the most difficult of all knots to undo. The Mathew Walker can also be made some distance from the end of the rope and the strands then relaid.

 Diamond Knot: Like the Mathew Walker, the diamond knot is ornamental - can be made same distance along the rope. The rope is unlaid carefully. Each strand is brought down alongside the standing end, as illustrated (top). The strands are then put through the loops formed by the other strands in lower sketch. The strands are hauled taut. The rope relaid. Shows the finished diamond knot.
 Double Diamond Knot: This is made as for the single diamond knot, but the strands follow the lead of the single knot through two single loops. The last strand comes through two double loops. The strands come out through the centre when the knot is pulled taut. All these stopper knots can be used for the ends of lanyards, halyards, yoke lines and also as stoppers on cleats, and for rope buckets.
 Turk's Head: This is a highly ornamental knot which, instead of being made with the rope strands of the rope itself, is formed with smaller cordage on the rope.
A clove hitch is made as in Fig. 1. This is made slackly to allow the extra strands to be worked through it. Pull the bottom part of the hitch above the top part and put the free end under and up (Fig. 2). The now bottom strand is pulled above the top part and the free end now over and down. This repeat till the circle is complete. The free end follows round three times. The completed Turk's head is shown in Fig. 3.
 Shamrock Knot: This may be formed the same way as the true lover's knot, but the bottom loop is not spliced. It may also be used to form three loops for stays for a mast. It may also be formed by making a knot as top sketch. The loop C is drawn up through loop D and the loop B is drawn up through the loop at A. These form the side loops and the top loop is formed naturally at E.
 Button Knot: Form two crossover hitches, as Fig. 1. Pass the loop end to the left and with the free end form another loop as shown. Now, with the free end, follow the lay as indicated in Fig 2 and lay the strands side by side as for the Turk's Head When three to five lays have been put through, work the knot tight and use the free ends to fasten the button to the garment. A bootlace makes an excellent button.
![]() Selvedge: To secure a block to a standing spar. The middle of the selvedge is laid on the spar and the two ends are crossed over in turns until the bights at the ends come together. The hook of the block is then put through these two bights.
Selvedge: To secure a block to a standing spar. The middle of the selvedge is laid on the spar and the two ends are crossed over in turns until the bights at the ends come together. The hook of the block is then put through these two bights.
Pointing A Rope
 The rope is unlaid and a tie put on to prevent it unlaying further. The strands are thinned down gradually, and relaid again. The end may be stiffened with a small stick or piece of wire. The end can be finished off with any of the crown or wall knots.
Knotted Rope Ladder
![]() The length of rope is coiled in a series of half-hitches and the end of the rope is passed through the centre, as in illustration on right (except that the coils are held close together as for a coiled rope when it is to be thrown). The coil of half-hitches with the end passed through the centre is turned inside out, that is, the succeeding coils are pulled over each other. The coil is now thrown, and as it pays out a series of overhand knots are made at fairly equal intervals. In making a knot ladder this is the quickest and most efficient method.
The length of rope is coiled in a series of half-hitches and the end of the rope is passed through the centre, as in illustration on right (except that the coils are held close together as for a coiled rope when it is to be thrown). The coil of half-hitches with the end passed through the centre is turned inside out, that is, the succeeding coils are pulled over each other. The coil is now thrown, and as it pays out a series of overhand knots are made at fairly equal intervals. In making a knot ladder this is the quickest and most efficient method.
Single Rope Ladder With Chocks
 This type of ladder has the advantage of being portable and quickly made. The chocks of hardwood are about 6" [15 cm] diameter and 2" [5 cm] deep, and are suitably bored to take the diameter of the rope. Splice an eye at the top end and seize in a thimble to lash the rope head securely. To secure the chocks, put two strands of seizing between the strands of the rope and then work a wall knot.
Alternatively, insert small pegs between the rope strands, and seize the rope with a binding below the pegs.
Lashing
Square Lashing: to join poles at right angles.


Diagonal Lashing: for bracing or joining spars at irregular angles.


![]() Sheer Lashing: to join two poles end to end.
Sheer Lashing: to join two poles end to end.
Start with a clove hitch or timber hitch, lash as in 1 and 2 tightly around the two spars four to six times as in 3. Pass free end under lashings. and draw tightly two or three times. Secure by passing it through itself, as in 4.
There should be at least two lashings if spars are being joined together.
Splices
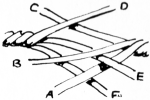 Short Splicing: Unlay the strands and marry them together; butt hard up to each other. The strand D first goes under the standing end of A, but over strand B and over C on the standing end. Thus each strand at either end goes over one strand of the standing end on the opposite side and under the next strand, so that there is a strand of the standing end between each short side of the splice. Continue working the free strand of each end four or five times into the strands of the standing end.
 Long Splicing: The strands are unlaid for a considerable length and then married as for the short splice. Then the one strand is unlaid and its married counterpart is laid along its place in the rope.
The two centres are simply held with a crossover knot, and the strands thinned down and spliced as for a short splice. The end strands are finished with a crossover knot and again the strands are thinned down and finished as for a short splice. This long splice does not appreciably thicken a rope which may be thus spliced to go through a sheave.
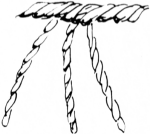
 Loop Splice Without A Free End: The rope is untwisted to the required place, as in top illustration. The free ends so formed are then spliced back along the rope after the loop has been formed.
 Eye Splice: A neat eye can be made in a rope end by an ordinary short splice after the loop or eye has been formed.
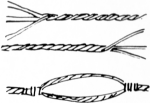
 Loop Splice: The strands are unlaid and laid side by side till the loop is the required length. The strands of the free ends are spliced into the ropes of the standing ends as for a short splice.
Toggle and eye - showing one application of splicing and whipping. Toggle is spliced and eye is whipped in sketch.
Whipping
![]() Before the finish of the binding a loop formed from the end is laid under the binding at the start. This end is bent back to form a loop and the last six to twelve turns bind over this loop. At the last turn of the binding the cord is put through the loop and the free end of the loop is pulled tightly, thus drawing the end of the binding beneath the last turn.
Before the finish of the binding a loop formed from the end is laid under the binding at the start. This end is bent back to form a loop and the last six to twelve turns bind over this loop. At the last turn of the binding the cord is put through the loop and the free end of the loop is pulled tightly, thus drawing the end of the binding beneath the last turn.
![]() This is another method. After pulling taut, the two free ends are cut close in and the whole binding is smooth and neat.
This is another method. After pulling taut, the two free ends are cut close in and the whole binding is smooth and neat.
To Fold A Flag For 'Breaking'
 The flag is folded neatly along its length four to eight times, and then the fly is either folded, concertina fashion, or rolled towards the hoist. The toggle is uppermost on the hoist, and the halyard is on the lower side of the hoist.
The halyard is wrapped tightly round the flag, and then bent, and the loop pressed under the last rollings, held by the pressure of the cord against the bunting of the flag.
The toggle is fastened to the eye of the halyard on the mast, and the free end of the flag hoist is fastened to the other end of the mast halyard with a double sheet or crossover bend.
Netting
Hammocks and nets are made by the use of a netting needle and a mesh stick. Either of the two types of netting needle shown in Fig. 1 are suitable and easily made from a thin piece of hardwood or bamboo. The netting needles may be about 8" to 9" [20 to 22.5 cm] long and from 3/4" to 1" [1.8 to 2.5 cm] wide. The mesh stick may be about 5" [12.5 cm] long, oval about 3/4" x 1/4" [18 x 6 mm]. The netting cord is put on to the netting needles as for an ordinary shuttle with needle B, and with needle A the cord is looped round the pin in the centre of the eye.
At one end of the string tie a loop and place the knot on a conveniently high nail or hook. The mesh stick is put under the loop and the needle with cord passed through as in Fig. 3. The needle and cord are passed in front of the loop formed in Fig. 3 and under the original loop, while at the same time the other end of the cord is held on to the mesh stick with the thumb of the left hand. The knot is pulled taut.
A succession of these loops are formed until the requisite width is reached, then this first series of loops are placed through a rod or cord, and the loops are netted on to them until the requisite length is reached.


Anchoring A Peg In Sand Or Snow
 The only way to anchor a rope into soft sand is to attach it to a peg, and bury the peg in the sand.
Scrape a trench in the sand to a depth of between 1' and 18" [30 and 45 cm], deeper if high winds or very stormy weather are expected. Pass the rope round the centre of the peg; scratch a channel for it at right angles to the peg trench.
Fill in the trench and rope channel, and fasten the free end of the rope to the standing end with a stopper hitch, and pull taut. The buried peg should hold a tent rope in sand under all normal weather conditions.
To Anchor A Rope In Open Ground
 A secure anchor in open ground can be obtained by driving a stout stake well into the ground. The rope is later fastened to the base of this stake.
To the head of the stake two ropes are attached, and these are tied back to the ground level of two other stakes driven well into the earth a few yards behind the first stake.
To the heads of these two stakes three ropes are tied and these are fanned out and tied to the bases of three other stakes driven in behind the two stakes.The main rope is now fastened to the base of the first stake. This is appropriately called the "one - two - three" anchor and will hold a very great strain if the ground is "solid."
Bush Windlass
 A bush windlass, capable of taking a very heavy strain on a rope can be made by selecting a site where a tree forks low to the ground, with the fork facing the direction in which the pull is required. Alternatively, a stout fork can be driven in and anchored with the "1-2-3" method.
The windlass portion is a forked log. The forks are notched to take the lever (up to 7' [2.1 m] long) . The rope is passed round the roller a few times so that it locks upon itself. (If the fork of the roller is long, the rope may pass through the fork).
This type of bush windlass has many uses.
Lariat Or Round Plait
Four strands of equal thickness are tied together at one of their ends.


Lariat plaiting must be kept "tight," that is, plaited close, and the flat strands must be turned as they twist round the two strands they have overlaid.
¤ Copyright 1999-2025 Chris Molloy ¤ All rights reserved ¤